Showing posts with label continental. Show all posts

Thursday, 5 February 2015

Sauces

Sauces
Do you know who deserves the big bucks at that fancy French restaurant you love so much? It’s the saucier (the sauce maker)! These alchemists are the most talented at balancing flavors to create the personality of the dish it accompanies.

Learning how to make sauces is definitely one of the most important ways of enhancing the flavor of your food.

Before we dive in to how, here are key terms to become familiar with:

SAUCE – Flavorful liquid, usually thickened, used to flavor and enhance other foods
PAN GRAVY – Sauce made with the juices or drippings of the meat or poultry with which it is served
JUS – Unthickened juices from a roast
As I shared in the Stocks section, fundamental to good sauces is a good stock. In fact, in order to achieve the depth of flavor and complexity you experience when you eat a restaurant-prepared sauce, you must use good stock.

Additionally, utilizing thickening agents to create the desired consistency is a critical  element in sauce-making. The options for thickening agents available are quite numerous. Each of the following works in a particular way:

ROUX – Cooked mixture of equal parts flour and fat used for medium and long cooking; can be cooked to white, blond or brown by cooking longer; thickening power  lessens the longer it cooks
BEURRE MANIE – A mixture of equal parts raw butter and flour
WHITEWASH – Mixture of flour and water
CORNSTARCH – Twice the thickening power of flour; produces a glossy sauce that is almost clear; however, prolonged boiling breaks it down
ARROWROOT – Produces a clearer sauce than cornstarch and lasts longer on the heat; used for jus lie; however, more expensive
WAXY MAIZE –Only thickener that can withstand freezing
PREGELATINIZED/INSTANT STARCHES – Thicken without heating; used for baking
BREAD CRUMBS – Used to add texture
PUREES, NUTS –Sauce gets thickened texture from ingredients
LIAISON –Mixture of egg yolks and cream, used to enrich and lightly thicken a sauce (proteins coagulate when heated)
CREAM – Added for extra richness and color (opaque appearance)
BLOOD – Used in many traditional recipes; to prevent coagulating, it is mixed with vinegar, lemon juice or alcohol and  tempered before adding
REDUCTION – Thickening occurs through the process of boiling/simmering a liquid to evaporate part of the water
MOTHER SAUCES

Foundational to all sauces are the five sauces that are referred to as “Mother Sauces”.

Each uses a different technique and serves as the basis from which all other sauces are derived. Therefore, if you can master these five sauces, you then have the ability to make a myriad of delicious sauces.

Below is a detailed explanation of how to make each of the Mother Sauces. And following this chart, are a set of diagrams detailing which sauces are derived from each of the Mother Sauces. If you’ve ever wondered what’s in all of those fancy-sounding French sauces, this is your guide!

BECHAMEL

PROCEDURE
In a pot, combine cold milk with ½ onion (spiked with bay leaf and clove) and bouquet garni (French term for a bundle of herbs which traditionally includes leeks, parsley stems, thyme, celery greens and bay leaf) with a pinch of salt and pepper
Bring to a simmer over medium-low heat and add cold roux slowly
Whisk until thickened
Strain through chinois
Add nutmeg and salt to taste
VELOUTE

PROCEDURE
In a pot over medium-low heat, add stock and bouquet garni with a pinch of salt and pepper
Once the liquid comes to a soft boil, add cold roux and whisk in until a la nappe (French term describing the thickness achieved when a sauce coats the back of your spoon)
Monter au beurre ( French term to describe the process of finishing a sauce by  whisking in butter to create a glossy and more flavorful sauce)
Add salt and pepper to taste
TOMATE

PROCEDURE
Preheat oven to 350*
Render bacon in a large pot over medium-low heat (on the stove)
Sweat carrots, onions, leeks and garlic in the bacon fat with a pinch of salt and pepper
Add tomato paste and cook to de

Varieties of caviar

Caviar varieties: http://youtu.be/9vmrC-0cLR4

Art in Apple turtle fruit carving garnish

Art In Apple Turtles | Fruit Carving Garnish | Party Food Decoration | I...: http://youtu.be/OosU9qZzCdw

Stocks and sauses

Stock:
   Stocks are one  of the most important foundation for  cooking.  A stock  is flavoured liquid. It firms the basis of many dishes, particularly soups and sauces. Stock is prepared by simerring various ingredients in water, a stock is the assence of flavour dispersed in water. Main stocks can defined into 4 types

1.White stock
2.Brown Stock
3.Fish stock
4.vegetable Stock

Elements of stock:
     A stock is composition of four ingredients : the nourishing elements, more points, bouquet garnish, and liquid. These elements are usually mixed in the following proportion to make most stocks: 5 parts nourishing elements,  1part more points, bouquet garnish, 10 parts liquid.

Brown stock:A stock that has been made up of roasted bones,it mainly consist of shanks from veal as they contain higher collagen that produce ever appealing gelatin look. The caremalization of the bones during roasting gives  stock to its color.

White stock:
    A white stock is a stock which is has been made up of unroasted bones.

Fish stock:
  Fish stock is made as same as white stock. It takes lesser time than white stock.  If Lemon or other acid is added to water, that result to flavourful liquid called fumes. A fumet is more strongly liquid than regular fish stock since it is reduced by 50%.

Fond:
    In French stock is called fond.

Uses of stocks


Monday, 2 February 2015

Creme Caramel

Creme Caramel

Classic French dessert without calorific overkill
image

Ingredients for 6

As this web site can calculate ingredient amounts for both Metric and US visitors and for any amount of persons, some measures may appear a bit odd at times. We do round and try to be as clever as we can with the calculations... If you have any ideas on improving this system, we would like your comments on our contact page.
for  
Show US units
Ingredients
4eggsegg(200 grams)
125gramscaster sugar
1podvanilla(6 grams)
600mlsmilk
For the Caramel
50mlswater
45gramscaster sugar
Salt content: 0% (by weight, not counting salt in other ingredients)
You can use vanilla extract instead of real vanilla if you want to spare the expense. It does taste and look nicer with real vanilla, though.

Method

Pre-heat the oven to 150 degrees Celsius / 300 Fahrenheit / Gas Mark 2.

This is the point where I have to confess that I made the batch in the photos below with vanilla flavouring as I didn't have a vanilla pod at home. If you can, use real vanilla, as you really can taste the difference!

Step-by-Step Instructions

Recipe PhotoAs a first step, we make the creme. Take 1/3 of the milk, cut open your vanilla pod lengthwise and boil it in the milk. Keep just below boiling for 10 minutes so that the vanilla flavour can enter the milk. Cool down a bit, then mix in the rest of the milk, the caster sugar and the eggs. Beat well. If you are using vanilla flavouring, you don't have to heat up the milk.
Recipe PhotoNow we are making the caramel. This takes a bit. Put the caster sugar and the water into a small saucepan. Now boil the mixture up so that the sugar dissolves and keep at a bubbly boil like in this photo. Occasionally stir with a fork, but don't overdo it.
Recipe PhotoAfter some time (this can take a good 10 minutes or longer), you will notice that the sugar turns golden brown.
Recipe PhotoNow you have to watch the caramel as you don't want to burn it. Stir it with a fork and brown it to your liking - don't go too dark as it will add a burned taste to the caramel. Quickly put the bottom of the saucepan into cold water (just very briefly, we only want the caramelising to stop).
Recipe PhotoNow you have to hurry - pour equal amounts of caramel into the ramekins and swirl the ramekin in your hand to distribute the caramel at the bottom so that it touches the sides.
Recipe PhotoWithin minutes, the caramel goes solid. This is the degree of caramelisation that I prefer - dark golden brown.
Recipe PhotoNow add the creme mixture into the ramekins.
Recipe PhotoPut the ramekins into a roasting dish and fill with boiling water so that the water goes half way up the ramekins. Put into the pre-heated oven and leave for 45 minutes.
Recipe PhotoNow the creme has set. Let the creme caramel cool down, then cover in cling film and put them in the fridge. You will have to leave them for 24 hours in the fridge so that the caramel is dissolved and enters into the creme a bit.
Recipe PhotoGo around the inner rim of the ramekin with a knife and turn out the creme caramel onto a plate and serve.

Creme Caramel

Creme Caramel

Classic French dessert 

4eggsegg(200 grams)
125gramscaster sugar
1podvanilla(6 grams)
600mlsmilk
For the Caramel
50mlswater
45gramscaster sugar
Salt content: 0% (by weight, not counting salt in other ingredients)
You can use vanilla extract instead of real vanilla if you want to spare the expense. It does taste and look nicer with real vanilla, though.

Method

Pre-heat the oven to 150 degrees Celsius / 300 Fahrenheit / Gas Mark 2.

This is the point where I have to confess that I made the batch in the photos below with vanilla flavouring as I didn't have a vanilla pod at home. If you can, use real vanilla, as you really can taste the difference!

Step-by-Step Instructions

Recipe PhotoAs a first step, we make the creme. Take 1/3 of the milk, cut open your vanilla pod lengthwise and boil it in the milk. Keep just below boiling for 10 minutes so that the vanilla flavour can enter the milk. Cool down a bit, then mix in the rest of the milk, the caster sugar and the eggs. Beat well. If you are using vanilla flavouring, you don't have to heat up the milk.
Recipe PhotoNow we are making the caramel. This takes a bit. Put the caster sugar and the water into a small saucepan. Now boil the mixture up so that the sugar dissolves and keep at a bubbly boil like in this photo. Occasionally stir with a fork, but don't overdo it.
Recipe PhotoAfter some time (this can take a good 10 minutes or longer), you will notice that the sugar turns golden brown.
Recipe PhotoNow you have to watch the caramel as you don't want to burn it. Stir it with a fork and brown it to your liking - don't go too dark as it will add a burned taste to the caramel. Quickly put the bottom of the saucepan into cold water (just very briefly, we only want the caramelising to stop).
Recipe PhotoNow you have to hurry - pour equal amounts of caramel into the ramekins and swirl the ramekin in your hand to distribute the caramel at the bottom so that it touches the sides.
Recipe PhotoWithin minutes, the caramel goes solid. This is the degree of caramelisation that I prefer - dark golden brown.
Recipe PhotoNow add the creme mixture into the ramekins.
Recipe PhotoPut the ramekins into a roasting dish and fill with boiling water so that the water goes half way up the ramekins. Put into the pre-heated oven and leave for 45 minutes.
Recipe PhotoNow the creme has set. Let the creme caramel cool down, then cover in cling film and put them in the fridge. You will have to leave them for 24 hours in the fridge so that the caramel is dissolved and enters into the creme a bit.
Recipe PhotoGo around the inner rim of the ramekin with a knife and turn out the creme caramel onto a plate and serve.

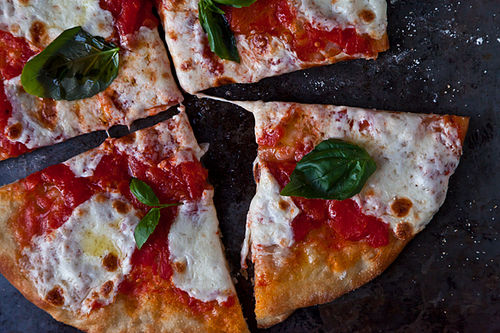
Pizza


Makes four 12-inch pizza crusts
Making the Dough
  • 500grams (17 1/2 ounces or about 3 3/4 unsifted cups) all-purpose flour, plus more for shaping the dough
  • 1gram (1/4 teaspoon) active dry yeast
  • 16grams (2 teaspoons) fine sea salt
  • 350grams (11/2 cups) water
  1. In a medium bowl, thoroughly blend the flour, yeast, and salt. Add the water and, with a wooden spoon and/or your hands, mix thoroughly. We find it easiest to start with the spoon, then switch to your hands (see slideshow).
  2. Cover the bowl with plastic wrap or a kitchen towel and allow it to rise at room temperature (about 72°) for 18 hours or until it has more than doubled. It will take longer in a chilly room and less time in a very warm one.
  3. Flour a work surface and scrape out the dough. Divide it into 4 equal parts and shape them. For each portion, start with the right side of the dough and pull it toward the center, then do the same with the left, then the top, then the bottom. (The order doesn't actually matter; what you want is four folds.) Shape each portion into a round and turn seam side down. Mold the dough into a neat circular mound. The mounds should not be sticky; if they are, dust with more flour.
  4. If you don't intend to use the dough right away, wrap the balls individually in plastic and refrigerate for up to 3 days. Return to room temperature by leaving them out on the counter, covered in a damp cloth, for 2 to 3 hours before needed.
Assembling and Baking the Margherita Pie
  • 4balls pizza dough from above
  • 128-ounce can best quality peeled Italian tomatoes (or fresh, peeled Roma tomatoes, if they're in season)
  • 2tablespoons extra-virgin olive oil
  • 1teaspoon fine sea salt
  • 2pounds fresh mozzarella cheese, torn into large chunks
  • 20fresh basil leaves, or to taste
  • 3/4cup finely grated Parmigiano-Reggiano cheese
  1. Put the pizza stone on a rack in a gas oven about 8 inches from the broiler. Preheat the oven on bake at 500 degrees for 30 minutes.
  2. Shaping the disk (Method 1): Take one ball of dough and generously flour it, your hands, and the work surface. Gently press down and stretch the ball of dough out to 10-12 inches. Don't worry if it's not round. Don't handle it more than necessary; you want some of the gas bubbles to remain in the dough. It should look slightly blistered. Flour the peel (or an unrimmed baking sheet) and lay the disk onto the center. It is now ready to be topped.
  3. Shaping the disk (Method 2): Take one ball of dough and generously flour it, your hands, and the work surface. Gently press down and stretch the ball of dough out to 6-8 inches. Supporting the disk with your knuckles toward the outer edge and lifting it above the work surface, keep stretching the dough by rotating it with your knuckles, gently pulling it wider until the disk reaches 10-12 inches. Set the disk on a well-floured peel (or unrimmed baking sheet). It is now ready to be topped.
  4. Drain tomatoes and pass through a food mill or just squish them with your hands -- it's messy but fun. Stir in the olive oil and salt. The sauce will keep, covered, in the refrigerator for up to 1 week.
  5. Switch the oven to broil for 10 minutes. With the dough on the peel, spoon the tomato sauce over the surface and spread it evenly, leaving about an inch of the rim untouched. Distribute 10 to 12 hunks of mozzarella (about 7 ounces) on top.
  6. With quick, jerking motions, slide the pie onto the stone. Broil for 3 1/2 to 4 minutes under gas (somewhat longer with an electric oven), until the top is bubbling and the crust is nicely charred but not burnt.
  7. Using the peel, transfer the pizza to a tray or serving platter. Sprinkle the Parmigiano and salt evenly over the pizza. Distribute the basil on top. Slice and serve immediately.

Thursday, 1 January 2015

Nimbu ka achaar

Nimbu ka Achaar (lime pickle)
Share
This is probably one of the two most popular of Indian pickles - mango and lime. It is surprisingly easy to make but takes patience and time!
INGREDIENTS
2 dozen medium to large limes quartered (remove seeds if you like)
3/4 cup white rock/sea salt
1/4 cup black rock salt
8 tsps aniseed/fennel seeds roasted and coarsely ground
8 tsps mustard seeds powdered
8 tbsps chilli powder
3 tsps turmeric powder
2 cups mustard oil
2 tsps mustard seeds
1 tsp asafetida
PREPARATION
Sterilise and dry a glass pickling jar.
Put the limes into it, cover with the white and black salts and mix well. Cover the jar tightly and keep it out in the sun for 2 weeks (this is the part where you must have patience!). The limes turn a pale brown color in this time.
Mix the mustard powder, fennel, chilli and turmeric powders together and add to the limes. Mix thoroughly.
In a pan, heat the mustard oil to smoking point and add the mustard seeds. They will splutter. When done add the asafetida and immediately turn off the fire.
Pour this hot oil over the limes and mix everything well.
Allow the pickle to 'rest' for a week before eating it.
Serve with rice, Chapati (Indian flatbread) or stuffed parathyroid.

Wednesday, 31 December 2014

Milkshakes


HOME
SHOWS
CHEFS & HOSTS
RECIPES & HOW-TOS
RESTAURANTS
VIDEOS
Food Network Feed
Recipe Box
Shopping List
Magazine
Apps
Shop

Search
50 Milkshakes
For Food Network Magazine
Main

Photos
Strawberry (No. 5)
View More Photos
Each recipe makes 2 milkshakes.
1. Vanilla: Blend 1 pint vanilla ice cream, 1/4 cup milk, 1 teaspoon vanilla and a pinch of salt.

2. Toasted Marshmallow: Broil 8 marshmallows on foil, turning, until browned. Make Vanilla Milkshakes (No. 1), adding 6 of the toasted marshmallows. Top with the remaining marshmallows.

3. S’mores: Broil 8 marshmallows on foil, turning, until browned. Blend 1 pint chocolate ice cream, 1/4 cup milk, 1 teaspoon vanilla, a pinch of salt and 6 of the toasted marshmallows. Top with crushed graham crackers and the remaining toasted marshmallows.

4. Fig and Port: Simmer 1 cup port and 1/3 cup chopped dried figs until the liquid is reduced by half; cool, then blend with 1 tablespoon port. Make Vanilla Milkshakes (No. 1); layer in glasses with the port mixture.

5. Strawberry: Blend 1 pint strawberry ice cream, 1 cup strawberries and 1/4 cup milk.

6. Mixed Berry: Make Strawberry Milkshakes (No. 5), replacing the strawberries with 1/2 cup each raspberries and blueberries.

7. Strawberry-Rhubarb: Simmer 1 1/2 cups sliced rhubarb, 2 tablespoons each sugar and water, and 1/4 teaspoon orange zest until soft; cool. Blend with 1/2 cup milk and 1 pint strawberry ice cream.

8. Chocolate Blend: 1 pint chocolate ice cream, 1/4 cup cream and 3 tablespoons chocolate syrup.

9. Corn Cereal: Steep 1 1/2 cups sweetened corn cereal (such as Cap’n Crunch) in 1 1/2 cups hot milk, 30 minutes. Strain and freeze in an ice cube tray. Blend the frozen milk cubes with 1 pint vanilla ice cream and 1 cup cereal. Top with more cereal.

10. Chocolate-Banana: Blend 1 pint chocolate ice cream, 2 frozen bananas and 1/4 cup chocolate milk.

11. Peanut Butter–Banana: Make Chocolate-Banana Milkshakes (No. 10), adding 1/2 cup peanut butter.

12. Boozy Banana: Make Chocolate-Banana Milkshakes (No. 10), adding 2 tablespoons rum.

13. Lemon Meringue: Blend 1 cup each lemon sorbet and vanilla frozen yogurt, 1/4 cup milk and 2 tablespoons jarred lemon curd; pour into glasses. Beat 2 egg whites and 2 tablespoons superfine sugar until stiff. Spoon onto the shakes and brown with a kitchen torch.

14. Raspberry Pavlova: Make Lemon Meringue Milkshakes (No. 13), replacing the lemon sorbet with raspberry sorbet and the lemon curd with 1/2 cup raspberries.

15. Key Lime: Blend 1 pint vanilla frozen yogurt, 1/2 cup milk, and the zest and juice of 6 Key limes.

 16. Pina Colada: Blend 1 pint vanilla frozen yogurt, 1 cup frozen pineapple chunks, 1 tablespoon cream of coconut and 2 ounces dark rum. Garnish with pineapple.

17. Coconut Tres Leches: Blend 1 pint vanilla ice cream and 2 tablespoons each sweetened condensed milk and cream of coconut. Stir in 1/2 cup toasted pound cake cubes. Top with toasted shredded coconut.

18. Maple-Walnut Blend: 1 pint vanilla ice cream, 1/2 cup milk and 2 tablespoons maple syrup. Put jarred walnuts in syrup in each glass and top with the ice cream mixture.

19. Mango-Yogurt: Blend 1 pint mango sorbet, 1 chopped mango and 2/3 cup plain kefir or yogurt. Top with chopped mango.

20. Mint Julep: Blend 1 cup each mint ice cream and vanilla frozen yogurt with 2 ounces bourbon. Top with mint leaves.

21. Mexican Chocolate: Blend 1 pint chocolate ice cream, 2 tablespoons milk, 1 tablespoon sweetened condensed milk and 1/4 teaspoon cinnamon. Top with turbinado sugar.

22. Mexican Vanilla: Boil 2 cups milk, 1/4 cup masa harina (instant corn flour), 2 teaspoons brown sugar and a pinch of cinnamon, whisking, until thick; chill. Blend with 1 pint vanilla ice cream.

23. Cookies and Cream: Soak 1 cup chocolate wafer cookies in 1/4 cup milk until soft. Blend with 1 pint vanilla ice cream. Top with more cookies.

24. Mint Cookies and Cream: Make Cookies and Cream Milkshakes (No. 23), replacing the vanilla ice cream with mint–chocolate chip ice cream.

25. Pumpkin Pie: Melt 1/2 stick salted butter and toss with 1 cup crumbled graham crackers in a baking dish; bake at 350 degrees F, 8 minutes. Cool. Blend 1 pint pumpkin ice cream and 1/2 cup milk. Top with the graham cracker crumble.

26. Cannoli Blend: 2 cups ricotta, 1 pint vanilla frozen yogurt, 1/4 cup each milk and confectioners’ sugar, 2 tablespoons chopped candied orange peel and a dash of cinnamon. Top with chocolate chips.

27. Chocolate–Peanut Butter: Blend 1 pint chocolate ice cream and 1/2 cup each peanut butter and milk. Top with chopped honey-roasted peanuts.

 28. Chocolate-Cashew: Make Chocolate–Peanut Butter Milkshakes (No. 27), replacing the peanut butter with cashew butter. Top with chopped salted cashews.

29. Mocha: Blend 1 cup each chocolate ice cream and coffee ice cream, 2 tablespoons milk and 1 tablespoon chocolate syrup.

30. Malted Mocha Chip: Blend 1 cup each chocolate ice cream and coffee ice cream, 3 tablespoons malted milk powder, 2 tablespoons milk and 1/4 cup chocolate chips.

31. Nutella: Blend 1 pint vanilla ice cream, 1/2 cup Nutella and 1/4 cup milk.

32. Mocha-Hazelnut: Blend 1 cup vanilla ice cream, 1/2 cup each chocolate ice cream and coffee ice cream, 1/4 cup each milk and Nutella, and 2 teaspoons chocolate syrup.

33. Olive Oil: Blend 1 pint vanilla ice cream, 1/4 cup milk and 2 tablespoons extra-virgin olive oil. Top with flaky sea salt.

34. Olive Oil–Almond: Make Olive Oil Milkshakes (No. 33), replacing the milk with almond milk. Top with chopped toasted almonds.
35. Black Raspberry: Blend 1 pint black raspberry ice cream, 1/4 cup each raspberries and seltzer, and 1 teaspoon lemon juice. Top with whipped cream.

36. Date: Simmer 1/2 cup chopped dates in 1 cup water until soft; drain and cool. Blend with 1 pint vanilla frozen yogurt, 1/4 cup buttermilk and 2 teaspoons lemon juice.
37. Coconut–Hot Fudge: Make hot fudge: Microwave 1/2 cup finely chopped bittersweet chocolate and 1/4 cup each cream and sweetened condensed milk, stirring frequently, until melted. Blend 1 pint coconut ice cream and 1/4 cup milk; layer in glasses with the hot fudge. Top with toasted shaved coconut.

38. Spumoni: Make the hot fudge from Coconut–Hot Fudge Milkshakes (No. 37). Cook 1 cup halved pitted cherries and 2 tablespoons each sugar and lemon juice until syrupy; cool. Blend 1 pint pistachio ice cream and 1/4 cup milk; layer in glasses with the hot fudge and cherries.

39. Peanut Butter Cup: Make the hot fudge from Coconut–Hot Fudge Milkshakes (No. 37). Blend 1 pint vanilla ice cream, 1/4 cup milk, 1 teaspoon vanilla and a pinch of salt; layer in glasses with the hot fudge and chopped chocolate–peanut butter cups.

40. Triple Chocolate Stripe: Make the hot fudge for Coconut–Hot Fudge Milkshakes (No. 37); add 3 tablespoons to each glass. Melt 4 ounces white chocolate with 2 tablespoons milk in a saucepan over low heat, whisking. Blend 1 cup chocolate ice cream and 3 tablespoons chocolate syrup. Layer the white chocolate and ice cream mixtures in the glasses.

41. Peach Melba Stir 1 cup crushed raspberries and 1 to 2 tablespoons confectioners’ sugar. Blend 1 pint peach ice cream and 1/4 cup milk; layer in glasses with the raspberry mixture. Top with whole raspberries.


42. Blueberry-Buttermilk: Simmer 1 cup blueberries, 2 tablespoons sugar and 1 tablespoon lemon juice until syrupy; cool. Blend with 1 pint vanilla ice cream and 1/4 cup buttermilk.

43. Tiramisu: Soak 6 ladyfinger cookies in 1/2 cup coffee; blend and pour into glasses. Blend 1 cup each coffee ice cream and vanilla frozen yogurt with 1 tablespoon each milk and sweetened condensed milk; pour over the coffee-ladyfinger mixture. Dust with cocoa powder.

44. Banana-Nut: Blend 1 banana,1 pint butter pecan ice cream, 1/2 cup toasted pecans, 2 tablespoons milk and 1/4 teaspoon vanilla.

45. Butter-Rum: Blend 1 pint butter pecan ice cream, 3 tablespoons butterscotch sauce, 2 ounces dark rum and a pinch each of cinnamon and cloves.

46. Butterscotch: Make Butter-Rum Milkshakes (No. 45), replacing the rum with scotch.

47. Ginger-Spice: Blend 1 pint vanilla ice cream, 1/4 cup milk, 1/4 teaspoon cinnamon and a pinch of salt with 1/3 cup Speculoos ginger cookie spread (or 6 crushed gingersnaps soaked in 1/4 cup milk).

48. Red Bean–Tapioca: Blend 1 pint vanilla ice cream, 1/2 cup canned azuki beans (Asian red beans), 1/4 cup milk and 2 teaspoons lemon juice. Place 1/4 cup cooked large pearl tapioca in each glass and top with the ice cream mixture.

49. Sesame: Steep 2 tablespoons ground toasted sesame seeds in 1/4 cup hot milk, 30 minutes. Blend with 1 pint vanilla ice cream and 1/2 teaspoon sesame oil.

50. Acai Boost: Blend 1 cup vanilla frozen yogurt, 1/2 cup frozen blueberries, 1/2 banana, 1/4 cup acai juice and 2 tablespoons protein powder.

Photographs by Levi Brown

LOG IN No account? Sign Up
 
Terms Privacy Policy Contact Us
AdChoices
© 2014 Television Food Network G.P.
All rights reserved.
Food Network Sites

View Desktop Version Back to Top

Wine Tasting Terms And How to Use Them

Wine Tasting Terms And How to Use Them


You know what wines you like but how do you describe them? Learn how to use wine tasting terms the right way to get the wine you want. Learning the fundamentals of tasting descriptions will also help you decipher wine writing and let you buy wine more confidently.
Using Wine Tasting Terms To Get What You Want
Besides referring to wine ratings, tasting terms are the only way we can quantify what a wine tastes like before we buy it. Learning what these words mean (and also how to use them yourself) is a very powerful skill to have in order to buy exactly what you want.
Some of the most useful wine tasting terms to know fall into these 4 categories:
1.       The Fruit Level
2.      The Sweetness Level
3.      The Body Profile
4.      The Finish

The Fruit Level


First things first, you’ll want to start identifying the fruit level in the wine. It doesn’t matter if the wine is light, rich, sweet or dry, they can all be categorized by the fruit level. We have many ways of describing fruitiness in wine but pretty much all wines can be shuffled into just 2 primary categories:Fruit Forward or Savory.
“Fruit Forward”
Common Terms: Fruit-Driven, Sweet Attack, Jammy, Extracted, Flamboyant, Sweet Tannin, New World Style, Juicy, Ripe
This is the most commonly used term to describe a wine with dominant flavors in the sweet fruit realm. This wine term doesn’t mean that the wine is sweet, it just means that they are bursting with sweet fruit smells.
·          Fruit Forward Red Wine Terms
Sweet Raspberry, Maraschino Cherry, Blackberry, Blueberry, Jam, Prune, Candied Fruit, Black Raisin, Baking Spices, Toffee, Vanilla and Sweet Tobacco
·          Fruit Forward White Wine Terms
Sweet Meyer Lemon, Baked Apple, Mandarin Orange, Ripe Peach, Mango, Sweet Pineapple, Ripe Pear, Cantaloupe, Crème Brûlée, Caramel, and Vanilla
“Savory”
Common Terms: Herbaceous, Earthy, Rustic, Food Friendly, Old World Style, Bone Dry, Elegant, Closed, Vegetal, Stalky, Stemmy, High Minerality
Savory, earthy or herbaceous wines are the antithesis of fruit-forward wines. While these terms don’t really do this wine profile justice, they help describe dominant flavors of the wine in the not sweet fruit category. It’s not that these wines aren’t fruity, in fact, most are loaded with fruit flavors in the tart/sour/bitter spectrum. For example, imagine biting into a bunch of raw black currants (cassis) or cranberry.
·          Savory Red Wine Terms
Cranberry, Rhubarb, Black Currant (aka Cassis), Green Bell Pepper, Green Peppercorn, Olive, Wild Strawberry, Sour Cherry, Mulberry, Bilberry, Peony, Wild Blueberry, Dried Herbs, Game, Sage, Leather, Tobacco, Charcoal, Tar, Underbrush, Garrigue, Gravel, Torrefaction, Mineral-Driven and Woodsmoke
·          Savory White Wine Terms
Lime, Lemon, Pith, Quince, Bitter Almond, Green Apple, Apple Skin, Gooseberry, JalapeΓ±o, Grapefruit, Green Papaya, Thyme, Chervil, Grass, Flint, Chalk, Petrichor, Minerally


The Sweetness Level


Wines get their sweetness from residual sugar (RS), which is leftover glucose from grape juice that wasn’t completely fermented into alcohol. However, our sense of taste picks up sweetness in varying levels. To keep it simple, most of us characterize sweetness in still wines with 4 levels of sweetness.
“Bone Dry”
This term implies extreme dryness with no residual sugar and is usually accompanied by the presence of astringency. Red wines get astringency from tannin and/or their savory or bitter fruit flavors. White wines get astringency from a quality that sommeliers and winemakers often refer to as phenolic bitterness, which is often described like the taste of grapefruit pith or quince fruit.


“Dry”
Most still wines fall into the dry category, even though our taste buds might tell us differently. Dry wines range from no residual sugar to 1 gram per 5 oz serving (150ml). Just so you know, most super premium red wine producers rarely have more than 1/3 gram of sugar per glass. A quick method of comparison: a packet of Sugar in the Raw contains 5 grams of sugar and a 5 oz serving of Coca-Cola has 16 grams of sugar.
“Off Dry”
This is a popular term to describe wines with a touch of residual sugar, which can be anywhere from 2–3 grams of residual sugar per 5 oz pour. Most off dry wines are white wines, although on rare occasions you can find high quality Italian red wines that fall into the off dry category. High acidity wines like Riesling will taste more dry than a lower acidity wine (like Viognier) at the same actual sweetness level.
“Sweet”
Sweet wines are generally Dessert Wines and have a wide range of sweetness varying from about 3–28 grams of sugar per 5 oz glass depending on the style. For example, a few of the most lusciously sweet wines in the world include Canadian and German Ice Wine, Tawny Port, Tokaji and Rutherglen Muscat.
CHAMPAGNE SWEETNESS: The sweetness levels in sparkling wines use terms like Brut andDemi-Sec. Find out about Sweetness in Champa


Having Trouble Finding Flavors in Wine?
If you haven’t read the guide on how to taste wine you’ll find a myriad of useful tricks that will help you develop your palate and taste wine like a pro.
How to Taste Wine and Develop Your Palate 


The Body Profile
Now that you have a good understanding of the 2 primary fruit categories and sweetness, you can focus on the body. Think of the body of a wine kind of like the difference between skim and whole milk. Of course, there are many factors that affect how we perceive body, from alcohol level and tannin to acidity, so it’s not an exact science.
TIP: Some wine varieties fit into all three body styles depending on how they’re made.


“Light Bodied”
Light bodied wines sit in your mouth more like a delicate unsweetened iced green tea or a refreshing lemonade. They may still have a long aftertaste that tingles on your tongue but they don’t fill your mouth like whole milk does. Generally speaking, most light bodied wines have lower alcohol levels, lower tannin, and higher acidity. Of course, there will always be a few exceptions.
·          Light Bodied Red Wine Terms
Subtle, Delicate, Elegant, Crisp, Thin, Finesse, Bright, Floral
 
 Light Bodied White Wine Terms
Light, Zesty, Airy, Lean, Racy, Crisp, Zippy, Austere, Long Tingly Finish, Brilliant, Lively
“Medium Bodied”
This term doesn’t really need to be applied to white wines. Red wines, on the other hand, benefit from this 3rd category of resolution. Medium bodied red wines are smack dab in the middle of the spectrum between a light red with lower tannin and a full bodied red with high tannin. Medium bodied red wines are usually called “food wines”.
·          Medium Bodied Red Wine Terms
Food Friendly, Moderate, Elegant, Juicy, Spicy, Fleshy, Tart, Mellow, Soft
TIP: Several classic medium bodied red wines use little to no oak aging.
“Full Bodied”
Full bodied wines fill your palate with their texture and intensity. As a general rule, full bodied red wines have high tannin and usually also have heightened alcohol levels above 14% ABV. Alcohol and tannin act more like textures on our palate which is why they are key components of full bodied red wines. Some full bodied wines stand on their own and are better not matched with food. Conversely, a few red wines are so bold with bitter tannin that they almost need a rich fatty food (like steak) to smooth out the tannin.
·          Full Bodied Red Wine Terms
Rich, Lush, Opulent, Rigid, Intense, Bold, Extracted, High Alcohol, High Tannin, Firm, Structured, Muscular, Concentrated, Hot
·          Full Bodied White Wine Terms
Rich, Lush, Oily, Buttery
TIP: Wines aged longer in new oak barrels tend to taste bolder.


The Finish
 It’s common to pause after first tasting a red wine because of the effect the aftertaste or finish has on the flavor. The finish is often the defining factor between a mediocre and an awesome tasting wine. So, what are the common types of finishes in wines?
“Smooth Finish”
Common Terms: Plush, Round, Velvety, Supple, Opulent, Voluptuous, Creamy, Buttery, Lush, Soft, Silky, Spineless, Flabby
This is the number one most asked for style of finish on a wine. However, smooth isn’t really detailed enough of a description to get what you might want. There are essentially 3 types of smooth finishes in wines:
“Tart Finish”
This is a common style of finish on higher acidity wines. These wines begin with tart fruit flavors and have subtle bitterness on the finish. For the most part, this style of finish is very common in wines from cool climate wine growing regions or from cool vintages. In super premium light white wines, a tingling tart finish is considered a great quality and usually lasts up to about 15 or 20 seconds.
“Sweet Tannin Finish” or “Smoky Sweet Finish”
This style of finish is common on oak-aged red wines.
“Dried Fruit Finish”
This style of finish is often found in aged red wines and red wines that are lighter in body and made with less oak aging.
“Spicy Finish”
Common Terms: Juicy, Sharp, Balsamic, Austere, Peppery, Lean, Edgy, Lively
Wines are sometimes described as spicy and this trait can be more intense in the finish of a wine. The sensation of a spicy finish on a wine is a sharp burning sensation that could be compared to the feeling in your nose you get from eating wasabi or horseradish. Many of us think of this type of finish as an alcoholic burn, but this is not always the case. There are a variety of reasons why wines have a spicy finish, from the type of grape (Cabernet Sauvignon and Barbera are known for their spicy qualities) to the type of acid that’s prevalent in a wine. While some spicy finish wines are excellent, sometimes this characteristic is a sign of a wine that’s out of balance.
“Bitter Finish”
Bitterness in red wines is from tannins and bitterness in white wines is called phenolic bitterness. Bitterness is more like an astringent feeling that has the sensation of scraping the insides of your mouth. We now know that this sensation in red wines is an interaction between proteins in our saliva and a type of tannin called condensed tannin that will build up on your palate over time. Bitterness on the finish is unpopular but it’s actually an amazing trait when you’re pairing wine with rich fatty foods.
·          Bitter Red Wine Terms
Chewy, Muscular, Structured, Firm, Rigid, Closed, Dried Herbs, Oregano, Bay Leaf, Bitter Chocolate, Baker’s Chocolate, Bitter Herbs, Austere, Angular, Grippy, Harsh, Coarse, Dense


Translate